How to fit a chimney lashing kit
- ATV’s instructions (concise)
- Bill Wright’s instructions (comprehensive)
Also see Basic ladder safety.
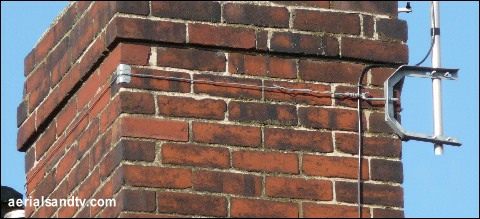
Installing A Chimney Lash Kit
ATV's concise instructions
Mitre chimney bracket installed round a chimney.
This isn’t one of ours, you can tell that because of the rust staining on it, which there wouldn’t be on one we sold because all our brackets are galvanised….

1 Install the J bolt and the Eye bolt (c/w its attached lashing wire) in the relevant holes of the chimney bracket. It is very important to ensure the nuts are unscrewed as far as possible so as to give maximum chance that the lash will tighten up at stage 5. [Also see 1 & 2 below]
2 Hold the bracket on the corner of the chimney and pass the lash wire (which is attached to the Eye bolt) round the chimney. Straighten the wire out and slightly "curve" it, then pass the wire over the top of the chimney, or around it, if necessary by throwing the end round and catching it.
Ensure the lash wire is horizontal all the way round the chimney.
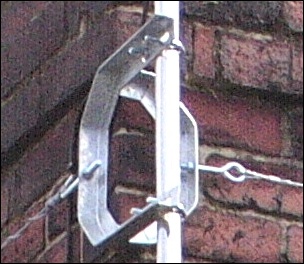
3 Loop the free end of the wire round the J bolt and pull as tight as possible, then wrap the wire round the J bolt twice. Finally wrap the wire about six times tightly back round the lash wire itself.
Now [and only now....] cut off the lash wire.
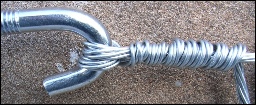
Note 1 : The use of long lash wires and (particularly) lash wires joined together reduces the chances of the lash tightening up before all the threads on the O & J bolts are used up. So, make sure you pull the wire as tight as possible (and the O & J bolt nuts are at the end of their threads at the start) before completing the lash loop round the final J bolt.
Note 2. Some "experts" say just wrapping the lash round the J bolt is insufficient and it should be 'spliced' to prevent slippage, some even recommend “rope grips”. Well I’m telling you, and them, that the above lash would never slip, absolutely no chance whatsoever. I’ve seen lashes only wrapped once round the J bolt and even they have never slipped in 20 years. Personally I would never recommend a single wrap, but it just proves a double wrap is 100% slip proof.
4 At this point, with the lash loosely assembled round the stack, bend out the lugs on the corner pieces, then push them under the lash wire and into place on the other three corners of the stack.
5 Now tighten the bolts sufficiently to firmly secure the bracket against the corner of the chimney.
6 Finally install the pole on the bracket. The aerial and cable would usually be pre installed on the pole at this point. If it’s a cranked pole ensure the aerial is pointing in approximately the right direction relative to the crank and the transmitter.
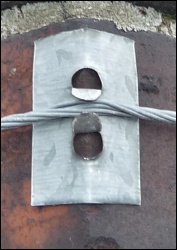
1 & 2 [as an alternative] In order to temporarily loop the lash around the chimney (before adding the bracket) pass the wire round the stack then lightly bend the free end of the lash wire so it can pass through the Eye bolt. With the lash wire already looped around the stack now place the chimney bracket on the corner of the chimney, install the eye bolt and the J bolt in the relevant holes on the bracket then attach the wire to the J bolt as described above (at 3 above).
Further points.
Do not install a chimney bracket on the top two or three courses of bricks.
Never fit a wall bracket on a chimney, unless it’s a big stack and a small aerial on a short pole.
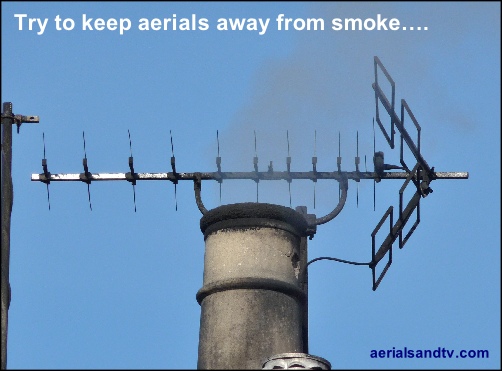
If the chimney is ever used, or likely to be used, install the aerial on the upwind (prevailing winds are usually from the S or SW) side of the stack preferably with a cranked pole. If possible fit an end mounting aerial (e.g. a Yagi10K) on correct side of the stack to "see" the transmitter using a short pole so the antenna is below the chimney pot. This is to avoid smoke damage to the aerial, not so much directly but by encouraging corrosion with all that pollution mixed with rain water.
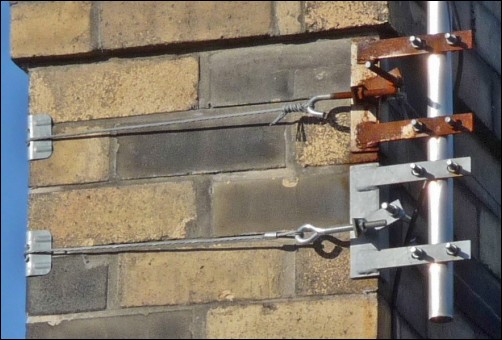
Two 6x6 chimney brackets used for one pole. This is perfectly acceptable, and is actually stronger than using one larger bracket.
Note the top lash is hand twisted and the bottom one is pre terminated.
Also note that the bottom bracket is galvanised and the top one only painted.
We only stock galvanised brackets.....
Bill Wright’s comprehensive instructions on fitting a chimney lash kit
By Bill Wright (Don Valley Aerials - South Yorkshire - 07930 347632)
A chimney lashing kit is a means of attaching a bracket to a chimney stack (or other masonry column of reasonable size) by means of a strong wire that goes around the stack and is under tension. Before attempting an installation have a look at a few pictures of fitted lashing kits, to get the general idea.
This article provides generalised information only and is not intended to amount to advice on which reliance should be placed. Circumstances and chimney stacks vary greatly so you must either rely on your own judgement every time, or call in an expert. This article does not include safety information.
- Check the contents of the kitThere should be a chimney bracket, a coil of lashing wire, two J bolts with nuts (or one J bolt and an eye bolt on the pre terminated end of the lash sire), and three corner plates. There might be two U bolts with nuts for fixing the mast into the bracket. There might be other bits and bobs: these can be discarded. Check that the nuts on the J bolts run free all the way along the thread.
- Examine the stack
A stack with only one flue (one pot) will be too small to have much strength so the limit for aerial loading is low. Such a stack must be in perfect condition if it is to have any aerial attached.
Stacks that have long cracks either vertically or horizontally are not suitable for lashing kits. Look for any signs that fumes can escape from the flue through cracks or holes in the masonry. Apart from being evidence that the stack is in poor condition generally, if such escapes coincide with a lashing wire the wire will corrode and snap very quickly.
If the stack is in poor condition and needs to be repaired allow five days for the mortar to go off before you attach a lashing kit.
2a. Brick stack
The masonry needs to be in good condition because the lashing wire exerts considerable force. Loose or broken bricks can be pushed into the flue by the wire where they can cause considerable damage. General movement of the brickwork can constrict the flue.
If the mortar is very soft or badly eroded the bricks are likely to move when the lashing wire is tightened. If the stack has been re-pointed it is quite likely that this will have been done with an inadequate depth of new mortar in the joints. The mortar might be weak. To be charitable this is called ‘cosmetic pointing’. It adds very little strength to the stack. You might have to investigate by poking a screwdriver into the mortar to test for strength and depth, and by tapping a few bricks to see if they seem solid. If you tap a brick and a thin line of new mortar falls away to reveal a gap or old sandy mortar with no strength, you should not fix anything to that stack.
If an insecure brick tilts over or breaks under the force of the lashing wire the wire will then be in the mortar joint and will be loose. The bracket will then be allowed to tilt, so it will exert considerable force due to leverage. In the worst case the whole of the stack above the level of the wire will be dislodged.
Remember that a solid-looking stack actually has only a single brick wall between the outside and the flues. Most of a chimney is a void.
Examine the flaunching. This is the mortar at the top of the stack that holds the pots. If it is in poor condition the brickwork is likely to be poor under the pointing. If the lashing wire causes slight movement of the bricks the flaunching can be disturbed, leading to a loose pot.
If the stack has been rendered you will be unable to assess the condition of the underlying masonry, and also the rendering might not provide a stable surface for the bracket or corner plates. Rendering is often used to cover poor brickwork. A thickly rendered stack might have rounded corners, making it impossible to fit a lashing kit securely unless the render is removed.
2b. Stone stack
All of the above applies equally to stone stacks, but with them there is also the question of the evenness of the faces. Very rough uneven stonework will not take chimney brackets and corner plates securely so it might be necessary to smooth areas of the stonework. If there isn’t much to do an ordinary pein hammer will do it by simply chipping away; otherwise it might be necessary to use a power tool. Consideration should also be given to using a double lashing kit and two-bracket set even for light loading, because with these the brackets get some stability from the mast.
2c. Concrete slab stack, ornamental plastic stack, etc
These stacks are not usually strong or stable enough to take a lashing kit.
- Decide whereabouts on the stack the bracket and lashing wire will be fitted
The highest few courses of bricks are best avoided because there is no weight on them. In general though it is better to fit the bracket high up and have a short mast than put the bracket low down on the stack and have a longer mast. Assuming a straight-sided stack, four or five courses from the top is reasonable.
But not all chimneys have straight sides. The brickwork might have corbelling (courses of bricks that stick out). Typically courses three and four, counting downwards from the top, will be corbelled, so you will fix below these to courses six and below. The course immediately below the corbelling is weak because it does not overlap completely with the corbelled course above. Check that the corbelling will not foul the mast. Very elaborate corbelling, in which a succession of courses protrude more and more, can present real difficulties both for bracket location and because of (straight) mast fouling if the bracket is fixed below them. Corbelled courses might not be strong enough to take a lashing kit. It’s a judgement call.
The flaunching might actually be in the form of a prefabricated concrete slab that projects beyond the brickwork, and this might foul the aerial mast. A cranked mast is one solution, but a better one is to cut the corner of the slab off with an angle grinder.
Very short stacks on the ridge line might not have enough courses above the ridge for a lashing kit.
- Preparations for fitting
If you are new to this job a second pair of hands can help.
Make a rough assessment of the length of the wire by multiplying the diameter of the coil by three and then by the number of turns. Work out the circumference of the chimney (counting the bricks can help) and add two feet. Is the wire going to be long enough? If so, read on.
Put the bracket on the stack at the planned finished location and check whether it can rock due to unevenness of the masonry. If it can there are three options. You can chip away at the masonry until the bracket seats firmly. You can try fitting the bracket a bit lower or higher on the stack than planned. As a last resort you can fit wedges (see later).
Fit the J bolts in the bracket with the nuts near the ends of the threads. Rest the bracket somewhere reachable, such as on the top of the stack.
The lashing wire is likely to be supplied in a tight and springy coil, which makes it difficult to handle. To get it more-or-less straight, pull it through your (gloved) hand, imposing a slight opposite bend with your thumb.
- Getting the wire around the stack
Holding a loop of wire of appropriate size throw it over the stack and manoeuvre it so it is roughly at the right level all the way round. If it’s a small stack, four pots or less, you should be able to do this easily.
If the stack has six or eight pots you might have to link the two ends of the wire together (with a simple hair-clip loop in each), position the link at the corner where you’re going to fit the bracket, and make your trepeditious way around the stack, getting the wire into place. If you have to do that, put the corner plates in place as well. Because the wire is loose they might slip down so be prepared to go round again later. If the corner plates are the type with wings bend the wings so they hold the wire loosely.
- Attaching the first J bolt
Fitting the bracket is a ‘handed’ task, meaning that which way you do it in the left-right sense depends on the orientation of the relevant chimney corner and yourself. Usually one face of the chimney breast will be right in front of you but the other will be to the left or right and less accessible. I’m going to visualise you fitting the bracket on the corner where the face of the stack that’s not so easy to reach is on your right.
Attach the end of the wire that’s coming to you from the right side of the chimney to the right J bolt, pulling enough wire towards you so you can reach easily. It is essential to make the joint tightly, and to make this easier you need to pull against it, so you should secure the left end of the wire to something; the roof ladder, a pot, or your leg. The reason the joint should be tight is that any slack has to be got out by tightening the J bolts which is tedious, and also it is possible to run out of thread, which would mean starting again.
The way to couple the J bolt to the wire is as follows:
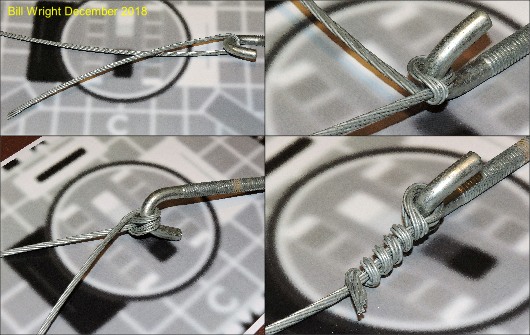
- Make a half loop with about 8” of tail.
- Pass the wire under itself and back over itself
- Loop the wire around the J bolt
- Pass the wire over itself and wrap it round tightly four or five times. Trim.
Done properly this coupling will have minimal slack to pull out, and will be self-tightening. Note that the route of the wire (over or under) and the direction it goes around itself, in stages two and four, must be opposite.
- Placing the bracket and fitting the corner plates
Place the bracket on the stack and as you do so pull the left end of the wire to take out most of the slack. Loop it onto the left J bolt temporarily. If you haven’t already done so fit the corner plates. If there isn’t enough slack gain a bit more by easing the loop on the left J bolt. The corner plates should span a masonry joint so the pressure from the wire is shared between two bricks. For this reason flimsy corner plates should not be used or they will fold.
It is essential that the wire goes dead straight around the stack. Differential pressure on adjacent courses of brickwork can cause the stack to shear. It will only shear marginally, just enough to relieve the pressure, but it will be badly weakened.
- Linking the left J bolt to the lashing wire
Pull as much slack out of the wire as you can and then temporarily loop it over the left J bolt as shown in picture (at 6). Hold the loop so it can’t pull out and use the bracket as leverage to tighten the wire, rocking it sideways and edging the wire around the stack from the right J bolt to the left one. If there’s a lot of slack you might want to take out the loop and make another one a bit further along the wire. You can get almost all the slack out of the wire this way, and it gives an early warning of any failure mode such as an unexpected brick movement. The temporary loop having been moved along the wire now becomes the first stage of the permanent joint between the lashing wire and the J bolt. This should be done the same way as for the right J bolt, having first checked that the corner plates are still in place.
- Does the bracket sit firmly on the brickwork?
Tighten both J bolts to take out any remaining slack but not enough to tension it. Check that the bracket can’t rock due to uneven brickwork. Even slight rocking will cause problems later. The bracket will rub on the bricks and wear them down. Eventually this will slacken the wire and the bracket plus whatever it supports will tip upside down. There’s also the likelihood of tapping and grinding noises that will go down the chimney and be heard in the house.If the bracket rocks at this stage you’ll have to wedge it. There are two convenient ways to make wedges. One is to use a spare corner plate: hammer it into position under the bracket. The other is to make an ‘L’ shaped piece of lashing wire, slacken the J bolts, and drop the ‘L’ shaped piece of wire behind the bracket. A misplaced wedge can effectively reduce the height of the bracket’s ‘foot’, thus increasing the leverage the bracket imposes on the lashing wire. The bracket must be in firm contact with the masonry at or very near the top and bottom of the foot, either directly or through a wedge. A wedge a third of the way down the bracket’s foot might seem to make it secure but eventually the whole thing is likely to come loose.
- Final tightening
You won’t need to use more than an inch and a half of thread if you’ve done everything else correctly, so this final tightening should be a quick job. Tighten the J bolts alternately. Watch that the bracket isn’t being pulled sideways and remains properly seated on the brickwork. To assist the tightening you can pull the lashing wire sideways away from the stack every so often. This takes the slack out so the subsequent spannering needs less effort. The wire needs to be taut but not excessively so. The main thing is to be sure you’ve taken all the slack out. If the wire suddenly slackens as you tighten it then a brick will have moved and you will have to start again.
- Is all this a bit daunting? If so ring for an expert! Paul Wright at Don Valley Aerials in South Yorkshire on 07930 347632

