Cable, connectors and leads
Also see wiring up plugs, connectors and wallplates.
Subject list :
The importance of cable incl :
- Surface plates (incl isolated wall plates)
- Cable routing tips
- Replacing cable installed in walls
- Testing cable “in situ”
- Install 2 cables.....
- Length of a typical cable run (incl "service loop")
- Cable route on the aerial
- Cable down the pole
- Cable over roofs
- Cable into (or out of) lofts
- Splitting the cable run
- Choice of cable colour
- Curves and clips
- Cable through walls
(not your window frame)
- Cable under carpets
The importance of cable
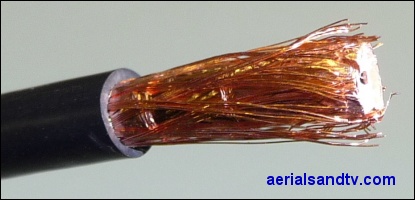
A fair proportion of problems with "poor picture" are not caused by the aerial at all, but by the cable. Usually it is perished or cracked or just bodged in the first place, e.g. a kinked cable or joined together with insulation tape etc etc. If it is a fringe area and there is a long cable run it could even be due to the use of "budget Low-Loss Co-Ax" cable

The cable is just as important as the aerial (and any amp or splitter, if fitted) in providing a decent signal. The cable should be changed as a matter of course if any work is undertaken on the aerial, unless you are sure it is sound and of good quality.
Tips for running cables
Replacing crappy cable already installed in walls. Well that’s an awkward one. Most aerial installers won’t attempt this, just in case the cables part company in the wall as they’re being pulled through and the customer then demands (somewhat unrealistically in my view......) the cabling is returned “to how it was before". Anyway, you can only try this if the cable run is 'loose', that is to say you can pull it at one end and it moves at the other. Cut the old cable square at the end and butt join onto the new cable by tightly winding some decent quality insulation tape round the join. Don’t use too much, because you don’t want the overall diameter to be much greater than the cable itself. Now gently pull it through, hoping it doesn’t get snagged half way up. If it does get snagged, pull it all out again and try the same process from the other end. If that doesn’t work, forget it and run a new cable down the outside wall.
Incidentally, if installing cabling in walls you should always use trunking, this is for a few reasons, not least because cable can absorb moisture from the plaster and then start corroding, particularly if it’s not copper copper !
Can a cable be tested (preferably in situ….) ? You can easily test a cable but only for basic short [s/c] or open circuit [o/c], not for any (lack of) screening or impedance matching problems. Short circuit problems with cable are actually more common than open circuit ones, this is certainly the case with new cable, which, very rarely, can be faulty !
To test for s/c ensure the ends of the cable are not connected to anything (see some aerials do read s/c), then use a multimeter (set to Ohms) across the centre core and the screening, obviously no reading should be registered. To test for o/c temporarily short out the centre core and screening of one end of the cable then connect the meter between the centre core and the screening (on the other end), a short (or at the very most one or two Ohms) should be indicated.
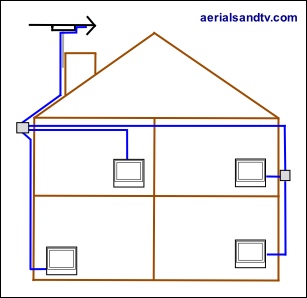
If installing CoAx cables for a distribution system in the walls of a new build or rebuild (i.e. where it’d be difficult to recable) we recommend that you install two decent quality cables to each point. This will help future proof the install even if you don’t need them at the moment, like if the Government ever threaten to switch off the terrestrial signal and force everyone to have satellite or whatever...... Lastly if one cable fails you've always still got the other one !
It’s also a good idea to use two different colour cables so you can identify which is which when you're at each end. On the subject of which, if you’re up in your loft trying to work out which cable has come from which room, try temporarily shorting out the cable and then checking with a multimeter at the other end which cable reads dead short.
If you plan to recable your aerial yourself, a the length of a typical cable run (on a two story house) from the chimney is about 15m. For a more accurate measurement you can count the bricks along the route you intend to take, on average each brick is about 3.75" (9.5cm) high x 9.75" (25cm) long (incl the mortar), but check yours is the same.
One should always buy a little more than is required because few things are more frustrating than completing the job only to discover you’re short of cable (which is why our installation kits are actually supplied with 20m ! ).
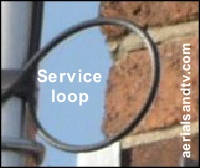
It is always a good idea to install a service loop of cable (about 5" in diameter) at an inconspicuous location at the bottom of the pole, this can save much time and hassle if you need to subsequently fit an amplifier or splitter. If you do need to extend the cable, or join it for any other reason, we recommend a cable joint kit.
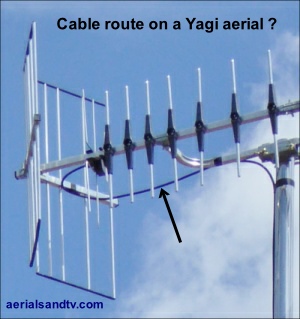
Now, on a cradle (centre) mounted aerial : how do I route the cable ?
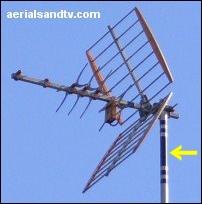
Do I route the cable back round the reflector and then onto the pole (as in the adjoining picture) ?
Or do I route it forward, round the cradle, and then down the pole ?
Well we did a series of tests and found no measurable difference. I’m not saying there isn’t any difference, I’m just saying we couldn’t measure it. It certainly looks worse if you route it back round the reflector though ! More on this subject.
More importantly, to help prevent the ingress of water, don’t forget to introduce a slight downward gradient to the cable (where it exits the aerial’s junction box), or, if the aerial is a Log Periodic, tilt it up at the front !
Next use decent quality insulation tape to secure the cable to the outside of the pole. Make sure you stretch the it a bit whilst you wrap it round, and remember to keep the tape warm in your pocket if using it in the cold weather ! The use of cable ties is not really recommended as they can "crush" the cable and some types can degrade in the sunlight, if they fail you don’t want to have to go back up to replace them ! Running the cable down the inside of the mast can also be problematic due to the possibility of chaffing on the cut end of the pole*, plus any wind movement can cause the downlead to bang against the inside of the tube in a most annoying fashion. Lastly, if you run the cable down the North side of the pole it will minimise exposure to the sun (clever ehh.....).
* For any cable run down the inside of a pole the possibility of wear on the cable (on the inside edge of the pole) can be reduced by ensuring it cannot move in the wind, and/or by "deburring" / smoothing off the inside edge of the pole and wrapping tape round the cable at that point.
The cable of a Starlink MkII cannot chaff on the top of the pole because the cable passes the end of the pole inside the Starlink's own stub pole, but that possibility still exists at the bottom. and this potential hazard should be minimised as advised above.
Ever wondered why some aerial installations use loads of tape on the mast, and in pretty imaginative patterns?
No I didn’t think you had, but I’ll tell you anyway.
It’s so installers can recognise their own handiwork ! I hesitate to use the term “tag” because that’s the name used by those scroats who deface so many things with their depressingly ugly graffiti.
Note the X Beam aerial falling apart.....
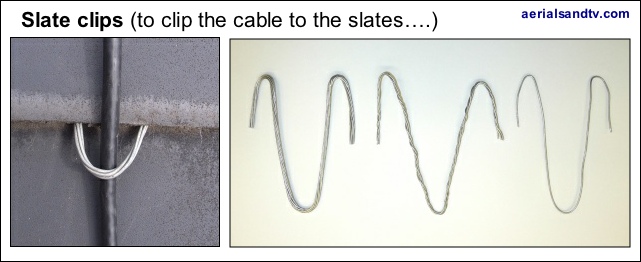
Try to avoid running cables over roofs (it will suffer maximum weather exposure there) but if you have to it should be clipped to the roof slates at regular intervals (see below) to prevent it moving in the wind and being worn away by the slates. The resulting holes let in rain water which seeps down the cable and ruins your TV tuner, or whatever else it’s plugged into. If you have had an aerial installed, always check to see if the installer has clipped the cable to the roof slates and unless he’s got a cast iron excuse *, I would insist that he does so. Any cable over a roof should run perpendicularly straight down it. Apart from the fact that a diagonal run looks terrible this will also stop any snow build up (remember that ?) from putting strain on the downlead.
* severe access problems would be mitigating circumstances.
The piece of cable in the picture below was run over a roof without utilising clips to secure it and the action of the wind has worn it away on the slates. Water can then seep into the hole and this can have a deleterious effect on the signal. Worse still is what can happen when the water reaches whatever the cable is plugged into......... Incidentally foam filled cable tends to impede the water from using your cable as a fall pipe rather better than air spaced cable, though it can still seep (somewhat more slowly) down the braiding.

The picture on the left is of a “slate clip” in use. Care should be taken not to crush the cable beneath the wire(s).
A Slate Clip is simply a few strands of galvanised lashing wire (as found in our lashing kits or the length of 10m lash wire) cut to around a foot long, then bent into the shape in the picture and wedged under the slates to secure the cable. The number of strands used would depend on how the tight the slates are against each other.
The best method of getting the cable into or out of the loft, if that’s where it’s needed, is through the end wall/gable, but some roofs (i.e. hipped types) do not have an end gable, so if you need to get the cable into the loft how do you do that ? Well I have to say that is an awkward problem.
There are two approaches, preferably try to get the cable in through the soffit, but if that’s not possible then lift a slate and push the cable under that. If there’s a lining under the slate you’ll have to cut a hole in it to get the cable in, then try to tape it up or silicone it. Bear in mind the lining should never get any water on it anyway, not if the slates are in good condition.
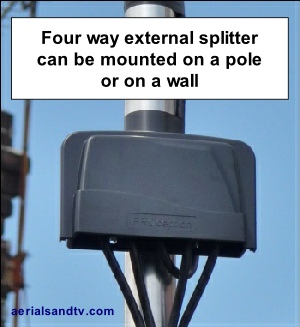
If you’re splitting the signal always use a splitter, never just bodge it together with insulation tape. It is often neater and more convenient to split the cable outside and this can be achieved by utilising a weatherproof external splitter (or an external amplifier). If using an amp, particularly a high gain type, try to avoid running the input and output cables side by side, as this can sometimes introduce "crosstalk" to the signal, especially if using cheap crappy cable.
The pictured splitter is a 4 way mast head type on a pole, but it could just as easily be mounted on a wall, and it’s also available in a 2 way version.
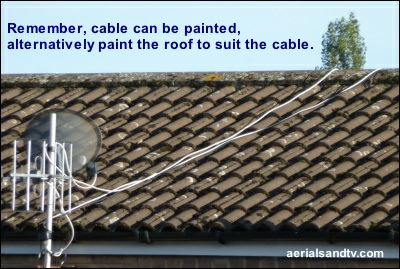
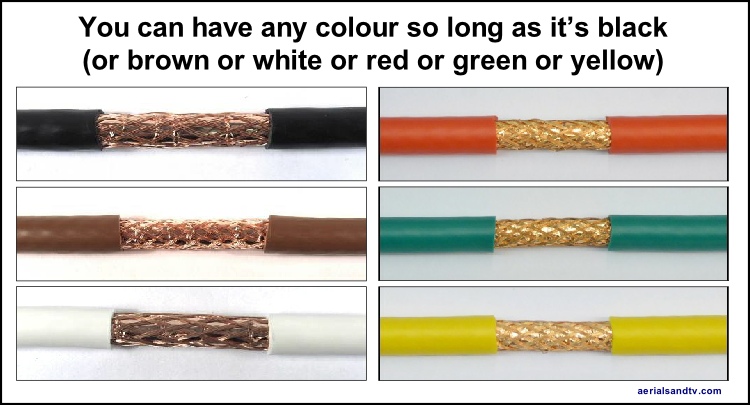
Careful thought should be given to which colour cable you use, and be particularly studious in your reflections as to if white is the right choice. Remember cable is available in black, brown and white (plus yellow, green and red actually ! ) plus it can be painted if required. The latter is useful if the house changes colour during the cable run, e.g. you have a white house but the cable also runs over a dark coloured roof. In the latter case a white cable over a roof looks terrible, so go for black or brown cable and paint it where it runs over the white walls.
Watch out for white.....…
Whilst routing downleads do not introduce sharp bends or kinks to them, the minimum recommended cable curve being about 10x the cable’s diameter, so 7mm cable would equate to around 7cm, or more if possible. If running a cable round a corner (between two walls) removing a bit of mortar will ease the curve. Note that foam filled cable is a bit less likely to kink anyway.
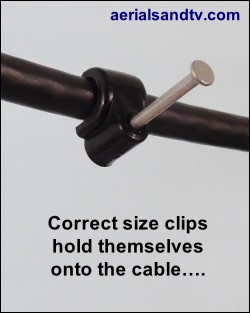
Always use the correct size clips for the cable (sold here). This is for two reasons. Firstly it’s important to avoid crushing the cable, secondly the correct size clip will hold itself onto the cable (rather than you holding it with your fingers) whilst you hammer it in, thus avoiding the possibility of said hammer greeting your finger tips. And the latter, I happen to know for a fact, is something Derrick gets a great deal of satisfaction from doing.
Horizontal runs across brickwork should use a clip every other brick (i.e. about every 18”), vertical runs should use a clip every 8 courses (i.e. about every 28”). Try to fix the top and bottom clips of the run first, then add the intermediate clips, this helps to ensure a straight run rather than looking like a dog’s hind leg...... And always use perpendicular runs (vertical or horizontal) because, let’s face it, diagonal runs look absolutely crap.
Lastly, what do you do if the clips won’t stay in because the mortar’s too soft and crumbly ? First try using longer pins/nails (you might have to drill out the hole in the clip) but if that doesn’t work then unfortunately you have to bite the bullet and put the clips into the bricks by drilling small holes, packing them with wood, and tapping the clip pins into them.
Cable through the wall not the window frame !
It may be easier to drill a hole through the window frame but it is bad practice to route the lead this way. It will encourage rot and if you replace your window(s) the cable will then need to go through the wall anyway. Incidentally if you ever have replacement windows fitted, do not allow the installers to "wedge" the cable under the frame. Apart from the fact it looks awful and the crushing of the cable should be avoided, when you eventually have the downlead replaced (cable does degrade over time) the old cut off stub will be left in situ for evermore !
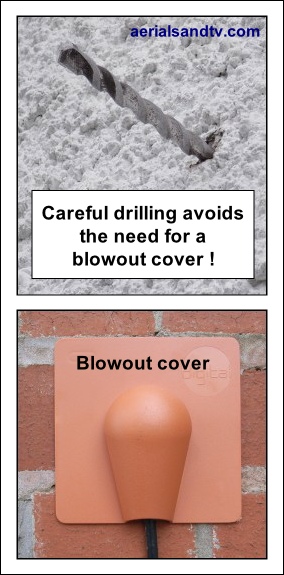
If you accidentally damage the brickwork*, whilst drilling the hole, we sell “blow out covers” (sold here) in brown or white. Incidentally these are just to cover up any “blown out” brick work, they are not primarily for preventing water ingress, you should silicone the hole and use a “drip loop” to do that. A drip loop simply means ensuring the cable runs up to the hole even if it has run down the wall beside it, hence it is looped back up to get to the hole. Obviously a "drip loop" is not necessary if the cable is naturally running up to the hole !
Hole covers are normally siliconed to the wall but can also be tacked on or even screwed on. When drilling a hole through the wall it should usually be done from inside to outside and with a slight downward inclination to help prevent any possibility of water ingress.
* NOTE ! : Damaging the brickwork (when drilling a hole out for a cable run) is very easy, particularly if using an SDS driller. If the hole is in a conspicuous place it’s even more frustrating. My advice is to research the depth of the wall (e.g. at a nearby window or door) and mark that on the drill. When you get close to that indicator drill very carefully. In fact try turning the hammer action off or even swapping to a normal percussion drill.
If any mains sockets are present in the area a hole drilled in a spot diagonally away from them should reduce the chances of hitting the cabling (don’t quote me on this……).
The temptation to run a cable under a carpet can be hard to resist. Sometimes it seems the only way and the cable is hidden as well, everyone’s a winner it would seem. STOP ! Never run a cable under a carpet, and this is particularly the case where people may walk on it. The cable won’t last long before it’s squashed, then you’ll have to take the carpet up and replace the cable (if you’re bodging it) or replace the cable and reroute it if you’re not…. You have been warned.
Cable loss / attenuation
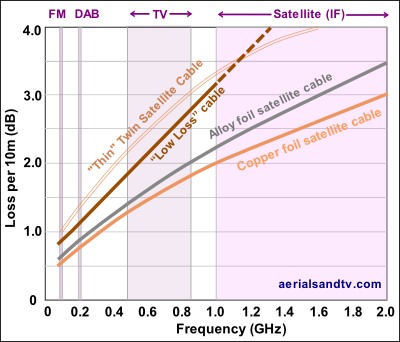
Graph of cable loss (in dB per 10m) for the three main cable types.
Note how at the FM frequencies the losses are far lower than at TV and satellite IF frequencies. The latter are the lower down converted frequencies from the LNB. Also note the poor performance of the thin type double satellite cable.
Also see interference tests for the various cable types.
See article Zone 1 or Zone 2 dish : the maximum recommended distance from a satellite dish to a receiver.
Double satellite cable
NOTE ! : When "parting" this type of cable it should be done by pulling one core forward and the other back, not sideways as this increases the risk of the outer insulation splitting.
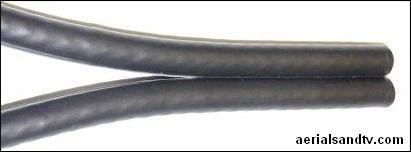
Also known as twinsat or shotgun use of this variety of satellite cable has mushroomed since the advent of Skyplus / Freesat+ (which requires two separate feeds from the LNB to feed its two tuners) but the cable can also be used for any install requiring two separate feeds from anywhere to anywhere, e.g. from two separate (i.e. not diplexed) aerials.
If you need to run two cables it’s neater and the 2 cables can easily be pulled apart to run the final distance(s) as individual runs, and they are often routed to two way surface plates, i.e. 2 cables in > to 2 sockets. You do need special wider clips (sold here) to tack it to the wall though !
There are two main types of Twin cable, the first is comprised of two standard cables (approx 6.5mm ea) and its performance is exactly the same as the individual cable would be.
We only sell this decent quality variant of Twinsat, in black, copper/copper and foam filled.
However there is also a second type composed of two thinner cables (approx 4.5mm ea) and its performance is really pretty bad, see graph. Obviously we do NOT sell this cable. The thinner cable has two advantages. First it’s significantly cheaper. Second it fits through the standard size drill holes that most installers use. This is why Sky has sanctioned its use despite its performance being so inferior that a well known manufacturer hinted to me (off the record) that they were ashamed to produce it. Even Sky only recommend its use on runs up to 20m, though many in the trade would only use it up to 10m, and the most quality conscious aerial installers would only use it up to, well, 0m.
Of course, this isn’t to say it won’t work fine if it’s a short run, or you’re just lucky, just as with "Low Loss" CoAx. Many bodges in this trade, and indeed in life, work for many people, but that doesn’t make them right. These people have obviously never heard about 4" fence posts, and they wouldn’t pay the extra for them even if they had.
The thinner cable does have another disadvantage, standard Co-Ax and F Connectors don’t fit it !
Avoid This Crap
The stuff on the right is absolute crap, it’s the worst stuff on the market. It's made by manufacturers aiming at the uninformed DIY market (e.g. Philex/SLX, amongst others). If any of them would like to sue me I’ll see them in court, but I’m rather unconcerned, because I know I’d win. Assuming, of course, that the judge knew anything about aerial installations........
Crap 3C-2V cable. It’s so crap it’s only 4.9mm in diameter.
Crap unscreened weakly constructed plastic splitter.
Crap plastic unscreened CoAx plugs.
Crap unscreened plastic surface box.
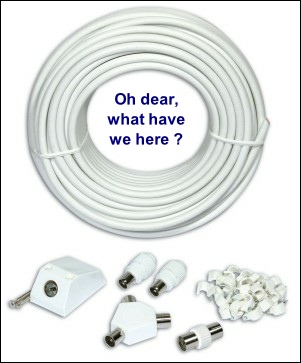
I only found out how crap this stuff was when a customer came into the shop wanting to buy some CoAx plugs to fit the 25m cable kit he’d just bought from Argos. We don’t stock CoAx plugs to fit thin 4.9mm cable, and neither does anyone else I know, because it’s so, well, crap.
To be fair to the customer he bitterly regretted purchasing said kit, but, unfortunately, he’d already run the cable under his fireplace !
Note. As with most bodges I’m sure there are many situations where this crap would work fine. If the signal was strong enough, or if the person installing it was flukey enough*, and if the plastic components didn’t get handled too much (and fall apart).
* In my experience bodgers generally do tend to be flukey.......
Also see feedback on fly leads.
How to join two cables together
A cable joining kit ! (sold here)
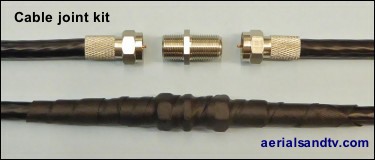
Obviously it is preferable to have a continuous cable run with no joins in it. Unfortunately this is not always possible and if the this method is used, a join which would be reasonably acceptable can be made. Screw an F connector onto each end and then utilise an F “Back to Back” to join these two ends together, see picture. If the joint is outside then self amalgamating tape must be used to waterproof the joint, not ordinary insulation tape. Cut off about one foot (we sell it by the foot and also by the 10m reel) and then remove the backing layer ! Start wrapping the tape round the joint about two inches above the join (stretching it to about half its width whilst you do so), ensuring you overlap the tape be at least half its width, then finish the same distance the other side. If possible (and it isn’t always possible) try to install the joint so that the cable runs downwards either side of it [so water will run away from the joint], better still place the joint where it is sheltered, e.g. under the eaves. No cable should be installed where it is under strain but obviously this is even more important where it is joined. Provided this is executed correctly this gives a reliable and waterproof joint.
We sell a cable joing kit consisting of 2 x F connectors, an F-conn B to B and one foot of self amalgamating tape.
TV Leads / Fly Leads
If you have a wall socket (and we don’t recommend budget unscreened types) then you need a lead from there to the set. Fly leads are relatively cheap so make sure you buy a decent one. In fact Digital UK advise (in their Aerial Installer Newsletters) that "blocking/sound disturbance is often due to an old or damaged CoAx fly lead running between the TV/STB and the wall plate". When they say "often" they only mean in about 5% of cases, but then again it’s a cheap thing to eliminate, so try it! The new high power 4G/5G transmissions also make good quality fly leads (plus decent cable from the aerial and screened wall plates, obviously) even more important. You have been warned !
The easiest way to spot a crap fly lead is to check how thick (or thin) the cable is, it should be at least 6mm in diameter. That said……. We stripped down a budget flylead which was marked RG59 (not, possibly significantly, RG59U) and despite being not far off 6mm in diameter it was appalling quality. The braiding wasn’t even acting as a screen, it, such as it was, was all grouped on one side as a “drain” wire !
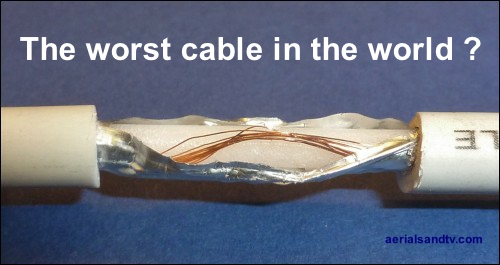
I can’t actually think why the screening on the above abomination is like it is. One possible reason is it makes it easier to solder it onto the barrel of the CoAx connector, and yes, it is just soldered on, not crimped. Almost all fly leads on the market are just soldered and moulded on because it's far cheaper to manufacture them like that (see picture below).
All decent cable should be double screened cable, the budget cable above is effectively only single screened. It is also important the plug is crimped to the end (see below) rather than just moulded on with the centre core soldered, because there are few things more annoying than an intermittent connection in your fly lead. In our experience this is most often caused by the centre core breaking off (at the soldered joint) where it’s been put under stress.
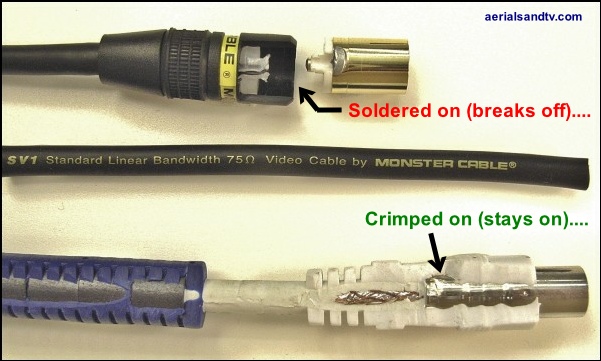
To quote that well known idiom “all that glitters is not a decent fly lead” (or something like that) and the above picture illustrates this perfectly. The top lead looks very flashy, gold plated in fact (gimmick, unless you live in a salt mine......) and it’s “Standard Linear Bandwidth” no less - whatever the hell that means - but it’s got a soldered on plug ! A customer bought the lead in to show us and kindly donated it to the aerialsandtv.com website. We cut it open to show the joint and took a picture, so here it is. Note that Gold plated plugs should only really be used with Gold plated sockets, because otherwise any advantage appertaining to said Gold plated connectors will be vastly reduced, so basically, I wouldn’t bother with them.......
Remember looks aren’t everything, substance wins over style in my book, every time. Here are the CoAx fly lead we stock (at 2m in length) and they really are good. The 6mm “double screened” cable is well worth having (though this cable is even better quality) but what’s just as significant is the crimped on plug, no weak soldered joint here.... What was interesting is that even the suppliers couldn’t tell us if the plugs were crimped on, the only way we could tell was to cut the lead open ! Also note the RF chokes, normally hidden under the blue plastic covering and the strain relief moulding (where the cable enters the plug) to ease any curve in the cable.
In 2019 we finally found a decent quality F connnector fly lead (in 1m and 2m lengths) and we sell them here. To be honest I can’t understand why we don’t sell even more of both types !
Also see feedback on fly leads

