Brackets and Clamps
No where in the internet will a page tell you more about all the brackets and clamps associated with aerial installations!
Also see Poles and masts
Subject list :
Brackets including :
- Brackets basic info including stand off
- Standard wall brackets
- “T & K” brackets incl:
more wall anchors = stronger install
- Bracket spacing
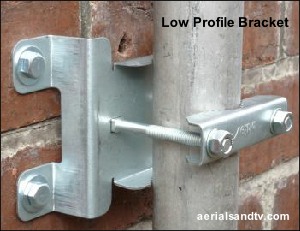
- Low profile brackets
- Galvanising
- Tilting brackets
- Mounting aerials on fascias?
- Wall or chimney bracket?
- Which bracket to use with which pole/aerial
- Bracket dimensions : in a comparative table
- Keep aerials out of smoke and fumes !
Bolting poles to brackets including :
- V bolts (also see 3.5” U bolt)
- V bolts rust first…..
- Use of saddles with V bolts
- Nyloc nuts
Pole clamps and couplers including :
- Pole to pole clamps incl:
parallel and/or perpendicular
- Pole couplers
- Multi angle bracket
When deciding how strong to make your install remember that the weight of the aerial/satellite/weather station is almost * irrelevant, it’s the wind loading that counts !
* If the antenna on the end of the pole is being whipped about significantly by the wind then the weight of it does become significant in the amount of force being put on the pole and brackets, but the fact it’s being moved about so much is a function of the antennas wind load anyway (plus the lack of rigidity in the pole and/or brackets) ! Basically, if possible, minimise wind loading and/or maximise the rigidity of the pole.
Remember, if you’ve got a big aerial on a long pole and it’s accessible, if particularly high winds are forecast it is sometimes possible to temporarily lower the install for the duration of the storm, use of stainless V bolts greatly assists in this…..
Bolting poles / masts to brackets : V bolt
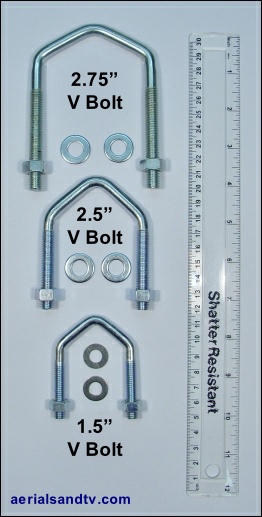
The most basic clamp is the "V bolt" which bolts the pole to its bracket, the most common sizes being in 1.5in & 2.0in (which we stock in both plated & stainless, the latter are recommended particularly for weather station installs). In addition we stock larger 2.75in V bolts. NOTE : Just because the V bolt looks like it's 1.5" it might not be.... I have seen V bolts which were, very frustratingly, about 2 or 3mm too small to fit a 1.5" pole. Why would anyone manufacture a V bolt which was just under 1.5" wide ? ! ? Incredible, but true.
All our V bolts are measured internal diameter.
All our V bolts come with washers.
If replacing a pole even the tightest aerial installer (and aerial installers are notoriously tight….) would use new V bolts, mainly because it’s far easier to just hacksaw off the old Vs rather than try and undo the nuts on rusty ones.
If you have to use V bolts larger than 1.5” make sure you check they will fit the bracket. Some brackets, esp 6" types, only accept 1.5" Vs. You may have to drill an extra hole yourself, or get the file out !
When using V bolts I would tend to tighten the bottom one more than the top one because if you crush the wall * of the pole you will significantly weaken it just at the point where it’s under most strain. In our tests all the poles (unsurprisingly) failed at this point. The bottom V bolt can be done up as much as you like to ensure the pole doesn’t twist in the wind, though using saddles is the most effective method of ensuring that. Risk of the pole rotating in its bracket is particularly important if using an end mounted aerial (though, apart from Log Periodics, we don’t actually recommend end mounting aerials for outside use) or a cranked pole, and especially using a Supercrank or a right angle crank pole.
* Crushing an 18G (1.2mm) pole is rather more likely than with the thicker 16G (1.6mm) or 14G (2.0mm) versions which we sell.
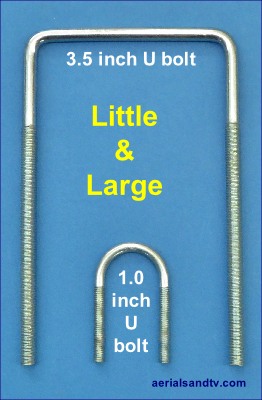
Apart from the three “standard size” V bolts (mentioned above) we also stock Little & Large V Bolts, the 1 inch U bolt and the 3.5 inch U bolt. Our 3.5” saddles fit the latter so as to make it suitable for poles.
Both the 1” and 3.5” U bolts come with nuts and washers, we’ve just omitted these from the picture so as to emphasise the sizes !
Also see our stainless steel extra long 2” V bolts which, unsurprisingly, but very fortuitously, fit our 2” saddles, thus they can be used as a form of 2x2 clamp

It should be noted that V bolts are the first thing to start rusting on a decent quality install (an alloy [or hot dipped galvanised] pole and a galvanised bracket). The V blots (assuming they're only plated which almost all are) would usually start rusting between 2 and 5 years after installation dependent on the local conditions, possibly around a year if next to the sea ! It must be admitted it’d take about 5X that length of time (or longer in some locations) for a V bolt to rust sufficiently to significantly affect its strength but removing the nuts would become problematic rather sooner than that ! The latter is particularly important when installing weather stations of the type which need regular maintenance…….
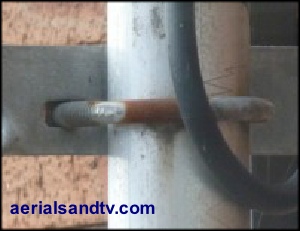
The reason the V bolts are the first thing to rust is because virtually all V bolts are (only) zinc plated. It’s not possible to hot dip galvanise a thread, for obvious reasons*. The only way round this is are stainless V bolts, they don’t rust but are obviously significantly more expensive !
* OK, for those it isn’t obvious to, the threads would fill with galvanising and the nut wouldn’t screw up. You can get round this using oversize nuts but how complicated do you want to make it ? Anyway, stainless are superior to (even) galvanised.
Use of saddles / sledges with V bolts
The great majority of aerial installers just bolt the pole straight to the bracket like in the top install of the adjacent picture. This is absolutely fine for most installations but if you have a large aerial in an exposed location then the use of saddles with the V bolts gives a stronger install. This is because the saddle grips the pole better, and, as a side benefit, means the V bolts don’t have to be done up quite as tightly to ensure the pole doesn’t slip round, or, in very rare cases, down ! As stated above excessive tightening of the V bolts, particularly the top one, should be avoided if possible because it weakens the pole.
Installs which would benefit most from the use of saddles are those likely to be subject to twisting forces, that is to say larger aerials on cranked poles, large end mounted aerials, or pole mounted satellite dishes. Starlinks are satellite dishes but they aren't particularly large, they're not generally mounted on the side of poles (= twisting force) and they're not vertically mounted either ( = lower windload) thus saddles aren't quite so important for them.
It must be said that using saddles makes raising (or dropping) the pole through the V bolts rather harder because the saddles grip the pole so well ! Thus I probably wouldn't bother with them on an install with a straight pole and either a centre mounted aerial (or a small aerial) as the wind induced twisting forces are lower.
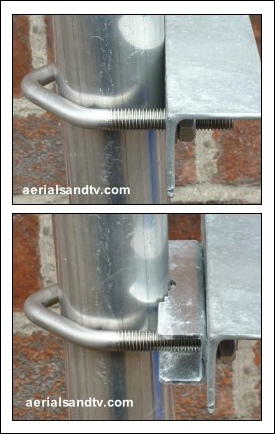
Various combinations of V bolt and saddle are available (examples are pictured) :
Plated V bolts - Stainless V bolts
Light duty saddle (1.5 to 2") Pre galv
Heavy duty saddles (2", 2.5", 3", 3.5" and 4") Spun galv
Stainless heavy duty saddles (2") (slotted so also fits 1.5" Vs)
Plus the 2.5" V + sledge (only in plated)
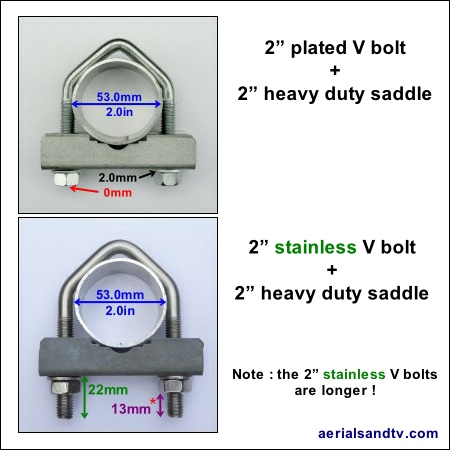
It is perfectly acceptable to use a 2.0in V bolt / saddle combination with a 1.25in or 1.5in pole. However, it must be noted that the plated 2.0in V bolt is not long enough to accommodate a 2in pole + saddle + bracket, though it is fine for poles up to 1.5in. The stainless 2.0in Vs are longer and can be used with a 2.0in pole and saddle (even with the H/D chimney brackets), as can the 2.5in Vs.
Nyloc / Nylock nuts v plain nuts
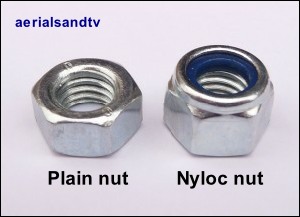
Ordinary plain nuts don’t usually come loose (if the correct torque is used) because of the friction between the nut and bolt, and indeed the fixture itself, but it’s not unknown for loosening to occur particularly if the joint is subject to vibration. This is where locking nuts, most commonly Nylocs, come in. Nyloc nuts are a type of self locking nut which utilises a ring of nylon (unsurprisingly…) to grip the threads of the bolt, the big advantage being that they don’t work loose. It must be said that hardly any aerial installers use Nylocs, partly because they cost more, but mainly because they take much longer to put on, you can’t spin the nut down the thread, it has to be wound down the whole way with a spanner. The other disadvantage of Nyloc nuts is they’re thicker than the equivalent plain nut, e.g. an M10 plain nut is about 8mm high whereas an M10 Nyloc is around 10mm. This can be significant if short of thread on the bolt. Obviously a Nyloc nut can still be used but if the thread doesn’t reach the nylon insert it would defeat the object because there wouldn’t be any locking function !
Nylocs can also be used on bolts which can’t be fully tightened up because movement is still required, e.g. hinge type mechanisms.
Most of our clamps are available with either plain nuts or Nylocs.
Nyloc nuts : for when you really don’t want that fastening to come undone.
The aero industry tends to use a lot of Nyloc type fastenings mainly because an unsecured wing (or two) does not tend to encourage passenger confidence.......
Wall Anchors : Shield anchors v wall plugs v sleeve anchors
The method used to fix a bracket to the wall is actually a subject of some debate.
The three main types of wall anchors, wall plugs and screws, sleeve anchors and the shield anchor.
For reasons given in the article below we only stock screws/plugs (in plated and stainless in 50mm and 75mm lengths) and sleeve anchors.
Also see testing the wall anchors !
And don't forget, the more wall anchors you use the stronger the install.....
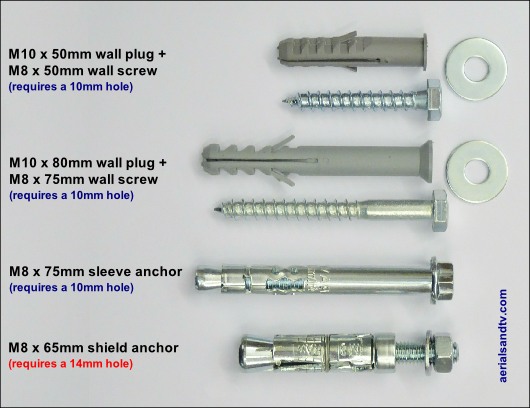
Should one use wall anchors of the classic type, the shield anchor (often known as Rawlbolts), or heavy duty versions of the plastic wall plug and screw variety (often referred to as Rawlplugs) ? There are arguments on both sides. Shield anchor type fixings can undoubtedly exert more grip on the brickwork, they will take a much bigger load than the screw /plug anchor, but there is a far greater risk of splitting the masonry if you tighten the fixing too far. Furthermore if one uses an M8 shield anchor fixing the hole in the masonry must be 14mm. And that is a pretty big hole, plus most people don’t have a 14mm masonry drill bit or, in many cases, a drill big enough to use it. One answer is to use a smaller shield anchor, but even an M6 type still requires a 12mm hole and an M6 fixing really does look a bit small for a wall bracket (you’d have to use a large washer on it ! ) though it’s stronger than it looks. Lastly, there are arguments that shield anchors (particularly large ones) shouldn’t really be used in bricks, for one thing the edge of the hole shouldn’t be within 50mm of the edge of the brick.
Virtually all aerial installers actually use M8 wall screws and M10 wall plugs in either 50mm or 75mm lengths (sold here), the latter are most often used in rendered walls. The SWL (safe working load) on a well fitted 50mm screw/plug combination is about 45Kg, though the maximum load would be around double this. A 75mm screw and plug combination would usually have a higher SWL than the 50mm but only if there is no void in the brickwork. If, when drilling the hole, you feel the drill bit has hit a void deeper within the brick (newer bricks are more likely to have voids than older types) then our advice is to use “Universal” wall plugs (sold here), albeit only available in 50mm length. I’ve used the latter and am very impressed with them, they may be a bit more expensive than conventional type wall plugs but I personally only buy universal type wall plugs now.
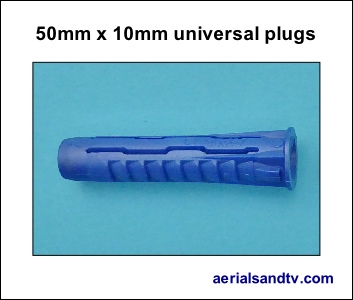
Anyway, the critical point with wall plug type fixings is that the anchor must be a tight fit in the masonry and be capable of taking a decent level of torque when tightening up (see crude tests on this). Shield anchor type fixings are more forgiving in that they can expand further to compensate for a hole which may be a little too big or masonry which may be a little soft. If you do find yourself in the position where any wall fixing won’t tighten up, try removing the screw, hammering some wood slivers (e.g. matchsticks) into the hole to pack it out then replace the screw. If it still doesn’t tighten up sufficiently hammer more wood into the screw hole and repeat the process until the screw will tighten up OK (this is less likely to be required if using "Universal plugs" ! ). At one time packing wood in a masonry hole was actually how it was done. Remember, sufficient tightening torque is the name of the game, and providing enough can be applied to a wall plug type fixing it is doubtful that it would ever fail, remember we weer testing poles to destruction and (before the holes became slightly enlarged) the screw/plug wall anchors were taking all the weight. Finally, always remember to ensure that any wall anchor is screwed into the brick, not the mortar.
NOTE : the SWL in wood (just the screws, obviously….) is significantly greater than for the screw/plug combination in masonry, provided the screw is installed correctly. We sell just the coach screws c/w washers (both in stainless or plated) separately for those not requiring the plugs.

There is one last type of wall anchor, the sleeve anchor (sold here). This is basically a shield anchor with a long thin shield ! They’re cheaper than shield anchors but, according to Rawl very nearly as strong (approx 300Kg SWL), for our purposes any difference is academic because the pole would have failed long before the (correctly installed) sleeve anchors. Sleeve anchors are more forgiving then standard wall plugs if the hole is a little too big (Universal plugs are better though), they’re not as forgiving as shield anchors but on the other hand they don't need such a big hole, they’re also less likely to crack the brick and can be installed a little closer to the edge of the brick (35mm ? ). I have experienced issues with sleeve anchors in soft breeze block type masonry, as have some of our customers. Technically resin anchors are the best choice for that kind of job but they’re expensive, difficult to get hold of and awkward to use so personally I just use Universal plugs.
Last, but by no means least, an M8 sleeve anchor only needs a 10mm hole !
NOTE : on sleeve anchors, unlike most other types of anchor, the sleeve is supposed to screw up to the nut, i.e. pass through the fixture.
Just one last thing, a slight downside of sleeve anchors is that if you accidentally put the anchor in the wrong place (or no longer need it) you can’t easily remove it ! You’ve got 2 options, the first is getting the angle grinder out. The second may not work but is worth a try. You remove the nut and the fixture. You carefully tap the bolt into the sleeve so the end is no longer wedging the anchor open, to have a chance of doing this you must obviously have originally drilled the hole somewhat deeper than the anchor. I would suggest the latter is a good habit to get into, apart from possibly assisting in anchor removal is also means there will be room for any masonry debris as the fixing is initially tapped into the hole (alternatively use one of those “blowers” for that). If the hole is drilled deep enough, you can, as a further option, just tap the whole anchor into the hole and leave it ! Anyway, assuming you would rather remove it, you then get a big pair of mole grips and squeeze the section of sleeve which is proud of the masonry against the bolt, and try and pull them out together (without the wedging action of the bolt). It sometimes works…….. If any reader uses any other method of removing redundant sleeve anchors please get in touch !
Also see my sleeve anchor won't tighten up.


